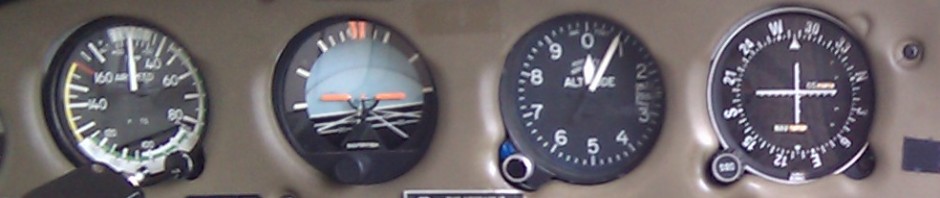
I was recently reading yet another review about the glass cockpits starting to appear in general aviation aircraft, when one comment struck me — the review mentioned how much pilots rely on the position of needles on analog (steam) gauges, rather than actually reading them. That makes a lot of sense (and everyone else reading this probably knew it already) — I hand fly all of my IFR, since I don’t have an autopilot, and there’s no way that I could maintain altitude in turbulence, talk to ATC, look up approaches and scan my instruments if I had to actually read numbers on each of them.
Altimeter
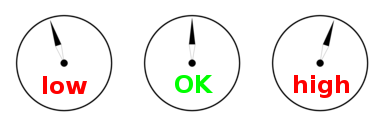
The altimeter is a very straight-forward example. In the following diagrams, I’ve drawn an altimeter face with all of the numbers removed and only the big (hundreds) hand. For IFR, you’re almost always going to be flying on an even thousand, so while you certainly want to look at the little hand once in a while (a lot, if you’re in moderate-to-severe turbulence), most of the time all you’ll be doing is trying to keep the big hand pointing straight up. If you glance quickly and see the needle in the first position, you’ll know that you’re slightly low, so you’ll add back pressure, power, or both. If you see the needle in the second position, you’re fine (though it won’t hurt to glance at the VSI and ASI for trends). If you see the needle in the third position, you’ll know that you’re slightly high, so you’ll release back pressure and/or reduce power until the needle looks like it does in the middle:
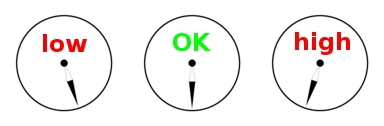
Note how little brain power this requires — the effort required to interpret the needle can be measured in tenths, if not hundredths of seconds, and you can often watch it with your peripheral vision while worrying about something else. Exactly the same thing applies to a VFR cruise altitude, except that your goal is to keep the needle at the 6:00 position (since VFRs cruise at altitudes like 3,500 feet, 4,500 feet, etc.):
Airspeed Indicator
I think that the same kind of approach works for the airspeed indicator. While I’ve flown only a small range of very slow planes, from all the photos I’ve seen, approach speed is nearly always around 3:00, cruise is around 6:00, and middle of the yellow line (i.e. you’re close to tearing your wings off) is around 9:00:

For my Warrior, 6:00 (straight down) is about 105 knots indicated, which is the expected IAS for 65% power. Normally I cruise at 75%, which is about 114 knots indicated, or somewhere around 6:30; if I wanted to cruise at 55% power, I’d want to keep the needle a bit on the right side, around 5:30. Normal approach speed is 70 knots (less for short field work or a light plane), which is almost right on 3:00. 9:00 is halfway between the yellow line and the redline, at 140 knots indicated. Again, all I normally have to do is make sure that the needle is a bit past 6:00 — something I can check almost subconsciously and using peripheral vision — and I’ll know that my speed is OK.
Vertical Speed Indicator
The last major analog gauge with a needle is the VSI, and absolute position applies here just as much. In the following diagram (again, without numbers), any pilot will recognize quickly that the first position shows a screaming dive, the second shows a normal descent, the third shows level flight, the fourth shows a normal climb, and the fifth shows a rocket-like climb (i.e. you’ve hit a mountain wave or blundered inside a big cumulus cloud):

That’s the Trick
We spend a lot of time during IFR training on using the attitude indicator and turn coordinator to keep the wings level, and on using the VOR/ILS gauges and the ADF needle to navigate, but I think that the real breakthrough for each IFR student probably comes when he or she no longer has to think about these other needle positions, but can simply deal with them reflexively while thinking about the bigger problems. IFR students feel rushed having only 10 minutes to get ready for an approach — a couple of years later, the biggest problem is how to entertain yourself during the extra 8 minutes.
Bugs
I’m not going to go into detail about glass cockpits, since I’ve never used them and would just be repeating things I’ve seen other people write. However, it is worth noting that, for all the numbers and fancy graphics, the most important part of a glass display is the bug — it’s too hard for the pilots to keep reading numbers, so they set a bug (a triangle graphic usually, I think) on the ribbon displays for altitude, heading, airspeed, descent rate, or what-have-you, then work just to keep the bug in the correct position. Analog-type pilots sometimes have bugs on their heading indicators and use those the same way. It all works out the same in the end, I guess.
Followup
A year later, I did log 0.5 flying behind a glass panel, and recorded my impressions.

I’ll second your ideas… I work in technology and so I’ve seen both bad and good interfaces. Whenever you have to read and interpret something it’s going to take more brain cycles than if you can just look at it and recognize a problem. This could be by the use of color.. shape.. or other spacial relationship that can be understood simply by looking at it. Also.. the less cluttered the better.
I have not used a glass cockpit either… but I know one thing I would look for is a way to turn off labels for things. As you learn the positions and readouts you should be able to declutter the screen by turning off any unneeded text. Then if something is abnormal.. the change would be more apparent.
Two words: Flight director.
I started using this technique on my last couple flights and I have to say that it is quite valuable. In fact, I don’t know why my instructor never mentioned it. I’m trying to train myself to take quick glances for needle position and make the adjustments more frequently. I’d love to get to where I do this subconsciously. This quick evaluation can only take place if you reduce the amount of information you have to process. That s why the needle position is useful…don’t even focus on the numbers. Thanks a lot for the tip! – Dan Larson, Private Pilot Instrument, Jeffco Aiport – Colorado
Pingback: Land and Hold Short » Cirrus SR22 demo flight: initial impressions
I remember pictures in this blog entry. Were they removed for some reason?
Mark: thank you so much for spotting that. The images must have gotten lost when I moved the blog over from my own server to WordPress.com, but I’ve restored them now.
Pingback: Less noise in the cockpit | Land and Hold Short
Pingback: Analog Flying | Abbotsford Flying Club
Absolutely! When I was a student, many years ago, we did a number of experiments to determine the optimum way of presenting information and we found that white figures/needles on a black background worked best. Moreover, we found that, as you state, you remember the position, the picture, not the reading. I have flown a glass cockpit, and I found that the use of strip displays for altitude, speed, etc terribly difficult to interpret, whereas with the old analog instruments the ‘picture’ gave you all the information at a glance, there was no ‘picture’ with the strip gauges, you had to read the numbers and then translate that into what the current state was. So, if I could have a glass cockpit and have the data displayed as analog instruments, I would be happy.